Washington Lamb Burger with a Moroccan Twist

Inspired by the cuisine of Morocco, these savory lamb burgers feature mint, coriander (fresh and dried), garlic, and cumin which results in a delicate yet intensely flavored burger that can be served over a salad, with a pita or in a traditional bun.

Back in September my husband, daughter and I took a day trip up to Christianson’s Nursery in the scenic Skagit Valley. The nursery is one of my favorite sources for unique plants but on this sunny Sunday our destination was The Skagit Valley Farmers Market held in The Vinery, a recently restored 6000 square foot historic pea vining site. This was the inaugural year for the market, which ran from May to September and on this Sunday the local artisans, farmers, ranchers, beekeepers and bakers offered an array of lovely items.

After poking around the simply stunning Vinery with my daughter, I started to hunt down my husband and eventually found him talking to Mike Donnelly of Martiny Livestock LLC, a small family ranch located in Birdsview, WA. Mike was enthusiastically showing my husband the cuts of processed and vacuum-packed lamb he had on hand. I then saw a sign on the table indicating we could purchase a whole lamb as opposed to cuts.

In short order, we arranged for pickup, and I now have an array of different lamb cuts at the ready-steaks, chops, ribs, and about 15 one pound packages of ground lamb. I’ve always loved a good lamb burger so I started to mentally fabricate flavor profiles that could work with such a treasure trove in the freezer.

Last week during a cold and dark rainy afternoon I decided to get adventurous and developed a Moroccan-inspired lamb burger. I basically added diced onion, fresh mint, and coriander, plus garlic, cumin and ground coriander with some panko and an egg. My husband formed the mixture into three five-ounce patties using a hamburger ring. Grilled outside during that horrific rain, served on a toasted brioche bun with homemade chimichurri and just picked winter lettuces, it was delicious, warming, restorative, and uplifting in each savory bite.

Here’s the recipe, which features a stovetop cooking technique on a ridged grill pan or cast iron frying pan but also offers tips for grilling outside…if you care to brave the elements!

Lamb Burger with Mint, Coriander and Cumin

A juicy savory grilled lamb burger with fresh mint, coriander, and cumin
Prep Time15 mins
Cook Time16 mins
Course: Main Course
Keyword: burger
Servings: 3

Equipment

  • ridged grill pan or cast iron frying pan
  • Pyrex bowl
  • spatula

Ingredients

  • 1 pound ground lamb
  • 1/4 small onion, chopped
  • 1/4 cup panko (Japanese bread crumbs)
  • 1 egg
  • 3 Tablespoons chopped fresh mint
  • 1/4 cup chopped fresh coriander
  • 4 garlic cloves, chopped
  • 1 teaspoon ground cumin
  • 3/4 teaspoon ground coriander
  • 1/4 teaspoon salt

Instructions

  • in a medium bowl combine the lamb, onion, panko, egg, fresh mint, fresh coriander, garlic, cumin, ground coriander and salt. With a spoon or very clean hands, combine the mixture thoroughly and divide into three even patties.
  • Spray the patties lightly with oil on both sides. Preheat a Le Creuset ridged grill pan or cast iron frying pan over high heat. Sear the lamb burgers one minute on each side. Then reduce the heat to moderately high and cook the lamb burgers for about five minutes on each side for medium doneness. (Alternatively cook the burgers on a grill, searing them for about a minute on each side and then moving them to moderately high heat on the grill and cook for about five minutes on each side as well.)
  • Serve the lamb burgers with traditional buns, brioche, pita bread or on a lightly dressed salad of seasonal greens.

Build a Bowl: Alaska Cod with Sesame Cauliflower Rice and Kimchee Slaw

Sunday morning inspiration: Build a Bowl!

I had some gorgeous wild Alaska cod on deck and needed to clear out some vegetables in the fridge. Last week I had been developing Quickie Kimchee recipes, so this morning I spontaneously decided to craft a Kimchee Slaw. Why wouldn’t a kimchee slaw work, I thought? I envisioned the telltale tangy spicy flavors wrapped around a fresher crunchier concoction…

Then, the cauliflower rice? Well, THAT was inspired by my preholiday trip to New York when I saw my daughter, bought her a Cuisinart Food Processor at Macy’s in Herald Square, schlepped it home and up the stairs, and then demonstrated how to use the whole thing while we chatted in her wonderful NYC apartment.

First thing on her list? Cauliflower Rice! No problem! The food processor’s metal disk and pulse button did an amazing job transforming that bulging white head into fluffy white nubbins that store great, cook in a flash, and have no carbs!

So, after all that, my convoluted concoction of fresh cod, cauliflower rice and kimchee slaw came together in a flash and was simply perfect served in big cozy bowls!

Alaska Cod with Sesame Cauliflower Rice and Kimchee Slaw
Serves 2 to 3

12 ounces Alaska cod

For the Sesame Cauliflower Rice:
1 small head cauliflower, cut into small florets
1 Tablespoon sesame oil

For the Slaw:
½ small head broccoli, stem discarded, and floret cut into pieces
¼ small head red cabbage (about 1 cup shredded)
¼ small head green cabbage (1 cup finely shredded)
4 medium carrots

For the Kimchee Dressing:
½ teaspoon garlic ginger paste ( I use Shan, it’s convenient)
½ teaspoon sriracha
½ teaspoon brown sugar
1 Tablespoon sweet rice vinegar

For the Garnish:
1 Tablespoon black sesame seeds for garnish
1 to 2 Tablespoons chopped fresh coriander for garnish

Prepare the Cod
Rinse the cod and pat it dry. Cut into two or three pieces, depending on servings desired, season lightly with salt on both sides and set aside.

Prepare the Cauliflower Rice:
In a food processor fitted with the metal disk, put half the cauliflower florets and pulse four or five times to make “rice.” Transfer to a medium bowl and repeat the pulsing process with the other half of the cauliflower.

Prepare the Slaw:
Put the broccoli florets in the work bowl and pulse two or three times to finely chop. Add to a large bowl.

Remove the metal disk from the food processor bowl and insert the thinnest slicing disk. Working through the feed tube, slice the red and white cabbage, cut to fit into the feed tube, using gentle pressure. Transfer shredded cabbage to the bowl with the broccoli.

Remove slicing disk and insert shredding blade, shred carrots through the feed tube, and add to the cabbage and broccoli.

Sprinkle cabbage, carrot and broccoli mixture lightly with sea salt and toss well with tongs. Set aside to wilt slightly.

Make the Kimchee Dressing:
In a small jar combine the Kimchee dressing ingredients: garlic ginger paste, sriracha, brown sugar and sweet rice vinegar. Shake to combine well and dissolve the sugar. Pour over the shredded vegetables, tossing to combine well.

Cook the Cauliflower Rice:
Spray a medium frying pan with oil, add the cauliflower rice and cook over medium heat, stirring, for two to three minutes. Add a few splashes of water, cover and cook for another minute. Stir in the sesame oil, remove from heat and keep warm, covered.

Cook the Cod:
Spray a cast iron ridged grill pan with oil and heat over moderately high heat. Spray cod lightly with oil, and when the grill pan is preheated, place the cod gently on the pan and let cook for about three minutes on both sides, or until just cooked through.

To Serve
Divide the sesame cauliflower rice between two to three bowls, set the kimchee slaw by the rice and top the rice and slaw with a piece of cod. Garnish with black sesame seeds and fresh cilantro. Serves 2 to 3.

Preparation Tips:
Preparing the cauliflower and vegetables might seem laborious but it’s worth noting that shredding and ricing vegetables in the food processor all at once is a great way to meal prep for the week ahead. The processed vegetables are far fresher than any “prepped veg” you will get at the grocery store and once they are prepped and stashed in the fridge for the week they are a cheap, convenient and healthy source of inspiration for work week dinners!!

No Food Processor? No Problem
Buy the cauliflower rice prepared or frozen. It won’t be as fresh, and it will be pricier but that’s okay.

For the Slaw? Get a sharp knife and slice the cabbages as thinly as possible. For the carrots, get a grater and watch your fingers! Or, as a last resort, buy a bag of coleslaw or shredded broccoli and try that.

Instant Pot Anxiety? Make Yogurt

On February 1, The Wall Street Journal ran an article entitled, “Instant Pot Anxiety? ‘I said a Prayer and Stayed the Hell Away.'”

In the piece, the author,  Ellen Byron,  interviewed various pot owners who had mishaps and struggled with operating the all in one appliance. I chuckled at some of the stories but admittedly the author was on to something. Every day when I peruse the Instant Pot Facebook feed, I see photos of Instant Pots in sealed boxes and cries for help and advice on how to take that first step to use the appliance. The posts weave into an interactive digital therapy session where fellow Instant Potters exclaim, “You can do it.”  “Just start.”  “My favorite easiest recipe is….” “Wear goggles and keep the kids outta the kitchen.”

As for me, I love my two Instant pots (6-quart duo and 3-quart mini) and use them daily without fail. Personally, I have never had pressure cooker anxiety because I started using the Kuhn Rikon stove top pressure cookers over twenty years ago. That being said, I can understand why some people hesitate. There are lots of buttons, The manual isn’t great. And, once you lock and load, commit to pressure and things start to rumble. there’s no turning back and you can’t open the lid and check the contents. It is indeed a leap of faith.

My solution for those folks who fret? Take the Instant pot out of the box, run the simple water test per the manufacturer’s instructions and make YOGURT!

Both of my machines have yogurt buttons and this cycle does NOT require putting anything under pressure. It simply creates a low heat that incubates your milk and starter and turns it into the rich luscious yogurt over the course of 8 hours. A miracle cycle in my mind!

I’ve tried various yogurt recipes but my favorites have come from This Old Gal and the only recipe I use now is her Instant Pot No Boil Yogurt Recipe which uses the whole Fairlife Milk found in many mainstream grocery stores such as Target, Safeway, QFC, and Winco. This particular milk does not require any preheating before making the yogurt so all I have to do is pour my half a gallon of whole milk into my 3 quart Instant Pot and whisk in two packets of YoGourmet starter. I then put on the lid, press the Yogurt Cycle and leave it alone for 8 hours.  There is no pressure. No noise. No steam. No wiggles or jiggles. Just a quiet incubation on the counter.

At the end of the cycle, the mixture has transformed into thick luscious creaminess. I then put my all natural yogurt, still in the Instant Pot’s inner container, into my fridge, covered and let it sit, undisturbed, overnight.

I use my yogurt on everything from granola and citrus segments to baked potatoes and kale salads. And, I’ve discovered that it makes a great tartar sauce to dollop on Alaska halibut or salmon.

So, if you want to buy an Instant Pot but are feeling, well, pressured…skip “manual” button and go for Yogurt.

Even if you never make anything else, the savings from making your own yogurt will pay for the pot in no time.


Edible Flowers are Trending for 2018

Flowers. They are gorgeous in the garden…and on the dinner plate.

According to a December 2017 article from Forbes, edible flowers are a predicted culinary trend for 2018. Indeed, why not?

If you have a garden, they are easy to grow and they add a delicious splash of color both in the yard and on the table.  Some easy options? Calendula,  chive blossoms, lemon gem marigolds, and nasturtiums are at the top of the list.

I’ve grown these annuals for years. The packets of seeds or starter plants are inexpensive and the plants don’t require a lot of fussy upkeep.  Many of them even attract bees and ward off those sticky pests known as aphids. Admittedly, however, I haven’t really bothered to sprinkle them on my dinner lately. That might change this year.

Looking for some direction on how to get started in your own backyard or on your balcony? Check out this Edible Flower Collection Seed Packet from Johnny’s Selected Seeds in Maine.   And, while considering this trend, be prudent and educate yourself before chomping.

For additional information and resources read “A Consumer’s Guide to Edible Flowers” published by Penn State Extension.


Lemony Dill Halibut Salad: A Scandinavian Refresh

I created this halibut salad this weekend after we had some friends over for dinner. My husband had cooked about three huge pieces of halibut from our June trip to Alaska and we had about a pound of cooked halibut leftover. While cleaning up on Saturday, I put it in the fridge. On Sunday I decided to do something with it to avoid waste.

My taste buds steered me towards a lemony Scandinavian flavor profile that day…I had attended the Nordic Culinary Conference here in Seattle back in May and I think it was those thrifty creative chefs—Claus Meyer, Sasu Laukonnen, and Titti Qvanstrom—  who inspired my path that afternoon.  At the conference, the chefs discussed how they avoid waste, use local ingredients, and employ simple techniques to ramp up inherent flavors and achieve impressive dishes.

So…while staring at a Pyrex dish full of flaky white fish,  I challenged myself to make a fresh and appealing salad with the leftover. Rather than just mix it up with some mayo which is the  traditional route to go for those who do employ leftover fish in their kitchens…I decided to ramp up the flavors.

Leftover fish can be a tough sell.  I wanted a “refresh”.

So, I looked in the fridge and the garden and pulled my Cuisinart forth on the counter. My food processor is crucial for challenges like this. It speeds the process and makes fish tidier to work with.  From the garden, I gathered a handful of dill, and a rummage through the fridge yielded some decent celery and a big voluptuous lemon.  With that, I had a game plan!

The key to my Halibut Refresh? I added lemon juice BUT I added it at a critical point.

I didn’t want to dilute that burst of sunshine.  I wanted to make sure it played a key role so I sprinkled the juice directly on the halibut and processed the halibut, celery and lemon BEFORE I added the mayonnaise.  I am convinced that this simple sequence in steps made an enormous difference in my end result because the lemon got mixed into the fish and the fish absorbed it, becoming light, sunny, and citrusy in the process. I then added the dill and the mayonnaise.

Here’s the recipe. A ridiculously appealing Alaska Halibut salad with definite Scandinavian tilt. I enjoyed it on piece of Larsen’s Bakery Light Finnish Rye. A match made in heaven.

Lemon and Dill Halibut Salad

3 celery stalks, cut into big chunks

8 to 10 ounces cooked halibut (poached, grilled or baked is fine), broken up into chunks

1 large lemon, rolled on the counter and then juiced*

2 to 3 tablespoons fresh dill

2 to 3 tablespoons low fat mayonnaise,  or to taste

Salt to taste

To Serve:

For serving: slices of lightly toasted rye bread and fresh Bibb lettuce leaves

For garnish: citrus zest, thinly sliced red onion, extra dill


Put the metal blade in the food processor, add the celery chunks and process the celery with three or four pulses to chop it. Put the halibut in the food processor, drizzle the lemon juice directly over the cooked halibut. Pulse once or twice to mix and incorporate the lemon juice. Add the fresh dill and the mayonnaise and pulse three or four times just to mix. Taste for seasoning and add salt to taste.

To create an open faced sandwich: Serve the salad on lightly toasted rye with a piece of lettuce and garnished with zest, extra dill, and thinly sliced onion if desired.

*Lemon Tip: To extract the most juice from a lemon, roll it on a counter before you juice it. You can also prick a couple holes the lemon, zap it in the microwave for twenty seconds, roll it on the counter and then juice it. These little techniques go a long way towards extracting all that sunshine from a lemon!


Banh Town in North Seattle: Vietnamese Street Food Served with a Smile

It pays to drive the carpool. It can be deliciously rewarding in many ways.

Twice a week I drive my son and his buddy over to evening lacrosse practice. En route, I get the scoop on everything from the Spanish curriculum at a local middle school to the boys’ recap on last week’s game.

Recently, one of our carpool conversations circled around food. We were talking about my son James’s favorite teriyaki joint in the neighborhood and our 14-year-old car pool passenger quickly chimed in with HIS favorite joint in the area…Banh Town.

Banh Town: Vietnamese Street Food. Banh Mi. Pho. Happiness

I was immediately intrigued by his suggestion because the place had been on my list for about two years…Will quickly gave me a recap on their pho and their sandwich selection. Sighing in the back seat, he told me their vermicelli salad was “the best.”  I think Will was in fact making a mental note to get back there sooner rather than later.

I made a similar note and this week when my husband and I wanted something light, fresh and different for lunch, I suggested Banh Town. We were soon out the door and on our way to this small, bright and cheerful little family owned and operated Vietnamese restaurant. Located at the busy intersection of Greenwood Avenue North and Holman Road and sitting right behind a Jiffy Lube, Banh Town is a treasure. The interior is bright and the walls are decorated with large  colorful photographs of Vietnam.


Vermicelli Salad.JPGChauanh, was our server and she is also one of the owners. Service with a smile seems to be the mantra at Banh Town and we were quickly briefed on the menu which includes an array of banh mi, pho, vermicelli salads and a variety of starters. Although I’ve been making a lot of pho during this wet and rainy Seattle winter we’ve been having, I opted to celebrate the sunshine yesterday and ordered the chicken vermicelli salad ($9.95). My husband had the five spice chicken banh mi ($6.95) and we shared two spring rolls ($7) and an order of quail’s egg poppers ($7), which were a family recipe from Grandma Le. ( I think Grandma Le might be Chauanh’s maternal grandma. We were told she is a great cook and she is cited as the recipe creator on a few of the flagship items on the menu so take note!)

Bahn Mi
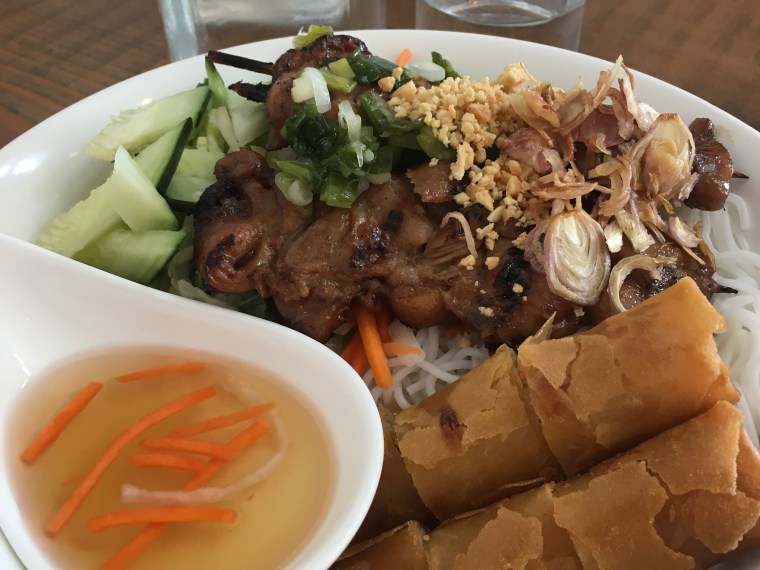
The banh mi arrived with a side of sesame slaw and the sandwich was light and beautifully done with a crispy airy French roll and lots of fresh cilantro. My salad was full of flavor and the skewered chicken was grilled to the perfect degree. Perched on top of cold vermicelli noodles and a cucumber lettuce combo, the chicken added a nice protein punch to the light and satisfying entrée. The quail’s egg  poppers were crispy on the  outside and the interior was subtle and comforting.

The bill was reasonable by Seattle standards and totaled less $40 with tax and tip. The restaurant  is now open seven days a week and offers takeout and delivery via Doordash and Postmates.

The restaurant’s logo touts: Banh Town: Vietnamese Street Food. Banh Mi. Pho. Happiness.

Yep, that pretty much sums it up.


Discover Asian Doodle Soup!

We’ve all heard about Zoodles…spiralized zucchini that often takes the place of pasta in savory dishes.

Well, I’ve come up with Doodles! Spiralized Daikon radish that works equally as well in hot and cold dishes.

Until yesterday, I had never bothered with Daikon radish, a huge mild white winter radish from Asia. A cruciferous vegetable high in fiber and low in calories, this vegetable is indeed an underappreciated powerhouse.  When I was at the upscale Asian market in my neighborhood this weekend, I noticed boxes and boxes of these radishes around the produce department. Clearly a seasonal loss leader, they were priced at 49 cents a pound so I decided to buy one.  At the time, I didn’t know what I’d do with it but I figured something would strike my fancy.

At home, I was going to originally prep the ingredients for my Asian Chicken Salad but the weather was awful over the weekend and the chill permeated so I ditched the salad idea and decided to craft a warm and soothing Asian soup. That’s when I had my AHA moment. The Daikon was on my counter and it occurred to me that the elongated vegetable would be perfect spiralized!

daikon-doodles-2017

So, I readied my  KitchenAid Spiralizer  with the fine spiralizer attachment, cut the daikon into five inch chunks, and attached it to the spiralizer. It spiraled perfectly and the “Doodles” worked great in an Asian pho with shredded Napa cabbage, cilantro, Thai basil and scallions.   I simmered them in a homemade Asian-style chicken broth over moderately high heat for about three or four minutes. After that,  they softened a bit but retained some crunch. A very satisfying low carb and low calorie way to get a hefty hit of vegetables on a cold rainy Seattle day.

I didn’t use them all in one go yesterday so I stashed the leftover Doodles in the fridge and they stored perfectly—no browning or discoloring and they remained crispy and crunchy overnight.

So, if you find Daikon on sale and you happen to have a spiralizer in your kitchen, give Doodles a go!


Duke’s Chowder House Publishes First Cookbook

Duke Moscrip, one of Seattle’s longtime and legendary restaurateurs, has just released his first cookbook. As Wild as It Gets: Duke’s Secret Sustainable Seafood Recipes is a hefty treasure to hold. Published by Aviva Publishing in New York and clocking in with a whopping 382 full-color pages, this book shares the recipes for all of the dishes served at Duke’s Chowder House.

Moscrip opened Duke’s in 1976 and the restaurant’s flagship dish, clam chowder, was inspired by Duke’s New England grandfather and the chowder that he served to Duke when he was a child. Over the years, the business has expanded and there are now six locations throughout the Puget Sound. Chowder remains a hallmark at the restaurant but over the years Duke has expanded the repertoire to include wild sustainable seafood much of which hails from waters here in the Pacific Northwest and, of course, Alaska.

The book, co-authored with Chef “Wild” Bill Ranniger, explores the story of Duke’s…and Duke…in great detail. Duke’s salmon sourcing trips to Alaska are highlighted as are family meals with his children and grandchildren.

I only received my review copy this morning and was pleased to be offered a copy as I cook a lot of seafood in my little kitchen. I’ve also eaten at Duke’s many times and a few years ago I wrote the press releases for the restaurant.   At first glance, the color photography in the book grabbed my eye and enticed my culinary instincts.  The recipes aren’t only geared towards seafood…they obviously run the gamut from soup to desserts.

Over the years,  I’ve admired Duke’s wedge salad, an iceberg classic,  so I was happy to see Sweet Blackberry Wedge Salad on page 116. The recipe for Nothing But Blue Sky Bleu Cheese is revealed and that’s one that is now on my recipe to do list.

After a quick glance through the recipes, I realized that I’d need to get organized and dedicate a little more time to recreating some of the dishes at home. Because these are restaurant recipes, there are often recipes within recipes, meaning to make a salad you have to make a specific dressing the recipe for which is found on another page. Some people might think this is too complicated to follow but it’s the nature of the beast when you recreate chef recipes.

That being said, even though I was short on time, I soon found myself rustling up ingredients and adapting one of the salmon recipes, “Wild Alaska Salmon Caesar Shoots” found in the “Appeteasers & Shared Plates” chapter. The photo shows little blackened salmon strips tucked snugly into romaine lettuce leaves drizzled with Caesar dressing.   In the recipe introduction, Duke mentions how he loves salads but salads require a bowl, utensils, a napkin, a chair etc. He said he liked this recipe because you have all the comforts of a salad but you can eat it with your hands! Aha! That description was perfect and it was all that I needed to launch into a spontaneous cooking session.  Admittedly, I didn’t follow the ingredient list exactly because I didn’t have all the spices handy for Duke’s Blackening Spice of Life. That being said, I used the technique described and the results were excellent…perfect finger food for Super Bowl Weekend.

So if you want to add to your seafood cookbook repertoire, check out this newbie. You will be inspired to not only follow the recipes but to use them as a culinary launching pad, tweaking and testing to suit your wild, wonderful and whimsical ways.