Build a Bowl: Alaska Cod with Sesame Cauliflower Rice and Kimchee Slaw

Sunday morning inspiration: Build a Bowl!

I had some gorgeous wild Alaska cod on deck and needed to clear out some vegetables in the fridge. Last week I had been developing Quickie Kimchee recipes, so this morning I spontaneously decided to craft a Kimchee Slaw. Why wouldn’t a kimchee slaw work, I thought? I envisioned the telltale tangy spicy flavors wrapped around a fresher crunchier concoction…

Then, the cauliflower rice? Well, THAT was inspired by my preholiday trip to New York when I saw my daughter, bought her a Cuisinart Food Processor at Macy’s in Herald Square, schlepped it home and up the stairs, and then demonstrated how to use the whole thing while we chatted in her wonderful NYC apartment.

First thing on her list? Cauliflower Rice! No problem! The food processor’s metal disk and pulse button did an amazing job transforming that bulging white head into fluffy white nubbins that store great, cook in a flash, and have no carbs!

So, after all that, my convoluted concoction of fresh cod, cauliflower rice and kimchee slaw came together in a flash and was simply perfect served in big cozy bowls!

Alaska Cod with Sesame Cauliflower Rice and Kimchee Slaw
Serves 2 to 3

12 ounces Alaska cod

For the Sesame Cauliflower Rice:
1 small head cauliflower, cut into small florets
1 Tablespoon sesame oil

For the Slaw:
½ small head broccoli, stem discarded, and floret cut into pieces
¼ small head red cabbage (about 1 cup shredded)
¼ small head green cabbage (1 cup finely shredded)
4 medium carrots

For the Kimchee Dressing:
½ teaspoon garlic ginger paste ( I use Shan, it’s convenient)
½ teaspoon sriracha
½ teaspoon brown sugar
1 Tablespoon sweet rice vinegar

For the Garnish:
1 Tablespoon black sesame seeds for garnish
1 to 2 Tablespoons chopped fresh coriander for garnish

Prepare the Cod
Rinse the cod and pat it dry. Cut into two or three pieces, depending on servings desired, season lightly with salt on both sides and set aside.

Prepare the Cauliflower Rice:
In a food processor fitted with the metal disk, put half the cauliflower florets and pulse four or five times to make “rice.” Transfer to a medium bowl and repeat the pulsing process with the other half of the cauliflower.

Prepare the Slaw:
Put the broccoli florets in the work bowl and pulse two or three times to finely chop. Add to a large bowl.

Remove the metal disk from the food processor bowl and insert the thinnest slicing disk. Working through the feed tube, slice the red and white cabbage, cut to fit into the feed tube, using gentle pressure. Transfer shredded cabbage to the bowl with the broccoli.

Remove slicing disk and insert shredding blade, shred carrots through the feed tube, and add to the cabbage and broccoli.

Sprinkle cabbage, carrot and broccoli mixture lightly with sea salt and toss well with tongs. Set aside to wilt slightly.

Make the Kimchee Dressing:
In a small jar combine the Kimchee dressing ingredients: garlic ginger paste, sriracha, brown sugar and sweet rice vinegar. Shake to combine well and dissolve the sugar. Pour over the shredded vegetables, tossing to combine well.

Cook the Cauliflower Rice:
Spray a medium frying pan with oil, add the cauliflower rice and cook over medium heat, stirring, for two to three minutes. Add a few splashes of water, cover and cook for another minute. Stir in the sesame oil, remove from heat and keep warm, covered.

Cook the Cod:
Spray a cast iron ridged grill pan with oil and heat over moderately high heat. Spray cod lightly with oil, and when the grill pan is preheated, place the cod gently on the pan and let cook for about three minutes on both sides, or until just cooked through.

To Serve
Divide the sesame cauliflower rice between two to three bowls, set the kimchee slaw by the rice and top the rice and slaw with a piece of cod. Garnish with black sesame seeds and fresh cilantro. Serves 2 to 3.

Preparation Tips:
Preparing the cauliflower and vegetables might seem laborious but it’s worth noting that shredding and ricing vegetables in the food processor all at once is a great way to meal prep for the week ahead. The processed vegetables are far fresher than any “prepped veg” you will get at the grocery store and once they are prepped and stashed in the fridge for the week they are a cheap, convenient and healthy source of inspiration for work week dinners!!

No Food Processor? No Problem
Buy the cauliflower rice prepared or frozen. It won’t be as fresh, and it will be pricier but that’s okay.

For the Slaw? Get a sharp knife and slice the cabbages as thinly as possible. For the carrots, get a grater and watch your fingers! Or, as a last resort, buy a bag of coleslaw or shredded broccoli and try that.

A Quick Gingery Salmon Pho

The Emerald City is living up to its reputation this week. Cold. Rainy. Dark. Ugh.

Yesterday, I was craving a light and lean salmon lunch but I couldn’t bear to make a salad so I decided to shift gears and focus on using some king salmon in soup. Chowder was too heavy so I started to explore pho as a reasonable option.

The more I thought about it, the more I liked the idea and began to wonder if I could devise a simple technique that would cook the salmon but simultaneously safeguard the fish’s buttery texture and telltale flavor.

Working quickly, I loaded my InstantPot with some chicken and vegetables, set it to high pressure for 25 minutes and headed to the Asian market in my neighborhood for some cilantro, Thai basil, fresh rice noodles, and Napa cabbage.

At home shortly thereafter, my soup came together in mere minutes. The hot simmering InstantPot broth was a ladled into a Le Creuset saucepan with finely shredded cabbage, a few slices of ginger, and about an ounce of rice noodles. That simmered for about two minutes and was poured into a pho bowl. I then added about two ounces of finely sliced skinless salmon into the steamy broth and let the salmon cook gently in the residual heat of the broth. I then added a final garnish of herbs and sliced jalapenos and my light and lean Gingery Salmon Pho was ready for slurping!

IMG_2763So, here is the basic and easily adaptable method for making a quick pho at home:

Step One:

Put about two cups of chicken broth into a small saucepan. Bring to a rapid simmer over medium-high heat.

Step Two:

Add about a half cup of finely sliced Napa cabbage , a few slices of fresh ginger, and about one ounce of rice noodles. Simmer for about two minutes, stirring once or twice.

Step Three:

Pour the steaming broth carefully into a  deep bowl, top with about two ounces of thinly sliced and skinned fresh salmon. Using chopsticks, gently poke the salmon into the hot broth to submerge it and to help it cook in the hot broth.

Step Four:

Garnish with finely chopped fresh cilantro, Thai basil if available, and thinly sliced jalapenos. Serve!

Banh Town in North Seattle: Vietnamese Street Food Served with a Smile

It pays to drive the carpool. It can be deliciously rewarding in many ways.

Twice a week I drive my son and his buddy over to evening lacrosse practice. En route, I get the scoop on everything from the Spanish curriculum at a local middle school to the boys’ recap on last week’s game.

Recently, one of our carpool conversations circled around food. We were talking about my son James’s favorite teriyaki joint in the neighborhood and our 14-year-old car pool passenger quickly chimed in with HIS favorite joint in the area…Banh Town.

Banh Town: Vietnamese Street Food. Banh Mi. Pho. Happiness

I was immediately intrigued by his suggestion because the place had been on my list for about two years…Will quickly gave me a recap on their pho and their sandwich selection. Sighing in the back seat, he told me their vermicelli salad was “the best.”  I think Will was in fact making a mental note to get back there sooner rather than later.

I made a similar note and this week when my husband and I wanted something light, fresh and different for lunch, I suggested Banh Town. We were soon out the door and on our way to this small, bright and cheerful little family owned and operated Vietnamese restaurant. Located at the busy intersection of Greenwood Avenue North and Holman Road and sitting right behind a Jiffy Lube, Banh Town is a treasure. The interior is bright and the walls are decorated with large  colorful photographs of Vietnam.


Vermicelli Salad.JPG
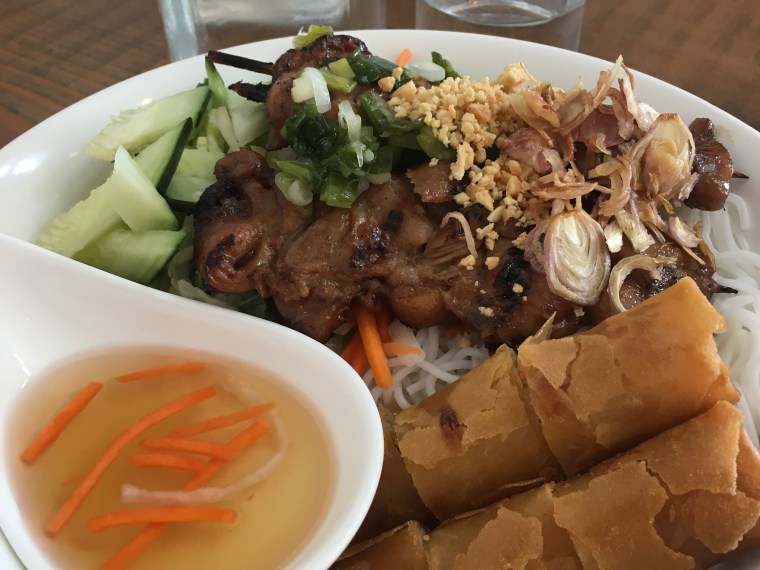
Chauanh, was our server and she is also one of the owners. Service with a smile seems to be the mantra at Banh Town and we were quickly briefed on the menu which includes an array of banh mi, pho, vermicelli salads and a variety of starters. Although I’ve been making a lot of pho during this wet and rainy Seattle winter we’ve been having, I opted to celebrate the sunshine yesterday and ordered the chicken vermicelli salad ($9.95). My husband had the five spice chicken banh mi ($6.95) and we shared two spring rolls ($7) and an order of quail’s egg poppers ($7), which were a family recipe from Grandma Le. ( I think Grandma Le might be Chauanh’s maternal grandma. We were told she is a great cook and she is cited as the recipe creator on a few of the flagship items on the menu so take note!)

Bahn MiThe banh mi arrived with a side of sesame slaw and the sandwich was light and beautifully done with a crispy airy French roll and lots of fresh cilantro. My salad was full of flavor and the skewered chicken was grilled to the perfect degree. Perched on top of cold vermicelli noodles and a cucumber lettuce combo, the chicken added a nice protein punch to the light and satisfying entrée. The quail’s egg  poppers were crispy on the  outside and the interior was subtle and comforting.

The bill was reasonable by Seattle standards and totaled less $40 with tax and tip. The restaurant  is now open seven days a week and offers takeout and delivery via Doordash and Postmates.

The restaurant’s logo touts: Banh Town: Vietnamese Street Food. Banh Mi. Pho. Happiness.

Yep, that pretty much sums it up.


Cookbook Review: Nourishing Broth

I love cookbooks and have hundreds of them in my home. New releases, trendy editions, vintage copies, dog-eared classics. You name it, I pretty much have it in my disorganized and tattered but beloved collection.

Over the years while writing for newspapers, Amazon’s Al Dente blog and my own website, I have reviewed numerous cookbooks and one of my benchmarks for judging a book is whether the recipes and tips really work. Lately, I’ve noticed that many cookbook reviews give a casual broad mention of the content and the author and it’s pretty clear that the reviewer didn’t really crack the book and put it to the test.

I often ask myself, did this person peruse it or use it? For me, the true test takes place on the stove and at the kitchen counter. Are the instructions logical and is the ingredient list accurate? Does the author erroneously assume knowledge and omit details that might impact the finished results? Do the recipes add value to the everyday repertoire? Is the content unique enough that the reader is encouraged to ditch tradition, take a risk and try something new?

Well, when I recently saw Nourishing Broth at the  Amazon Bookstore down at Seattle’s University Village, I put it on my cookbook bucket list and bought it a few days later. Admittedly, the paperback book isn’t flashy.but the contents are indeed explosive. Written by Sally Fallon Morell of the Weston A. Price Foundation, the book covers all aspects of making nutritious restorative homemade broths and is based on in depth research, countless studies, and no nonsense home based culinary tradition. Sally cites research and writes convincingly how a well crafted broth can help tackle issues such as osteoarthritis, rheumatoid arthritis, digestive diseases, mental health, athletic challenges, and even saggy middle aged skin and the dreaded cellulite! This is a lot of the stuff that our grandmothers knew intuitively but somehow got shoved aside as time marched on and the food scene became more dynamic.

Consisting of three main parts: Basic Broth Science, The Healing Power of Broth, and Recipes, Nourishing Broth sent me on a little quest.  I’ve always made homemade broths for my family and my kids often swear by how my chicken broth, when laced with ginger, garlic and cilantro, can quickly turn around a nasty cold.

Sally’s book, however, inspired me to tweak my tradition even further. With my list in hand at my neighborhood Asian market,  I headed for the meat department and purchased unique stubby cuts of beef with bones and collagen. On page 168 in the introduction to her recipe for Classic Beef Stock she says: “Good beef stock requires several sorts of bones: knuckle bones…marrow bones….meaty ribs…and shanks…”  I gathered a motley but beautiful collection of shanks, rib cubes, oxtail and more.

Following her basic recipe and using my big All-Clad slow cooker, I was flabbergasted by the depth of flavor, silky texture and  overall richness of the beef broth I created. I incorporated that broth into numerous soups and dishes that week and the feedback was very positive. I really knew I was on to something when I spontaneously worked the last of that broth and beef into a late night beef taco for my 14 year old son.He declared it the “best ever.” My beloved Golden Retriever even took note and sat patiently next too me while I drained the broth at the end of the day! When I half jokingly asked her if she liked “gravy” she licked her lips, wagged her tail and sat at attention!

Since then, I’ve made chicken and shellfish broth recipes from the book and incorporated many of Sally’s healthy tips. Priced at $23, this book offers tremendous value and endless healthy inspiration. I highly recommend it.

My Five Minute Yakisoba Noodles

Are you hard pressed to find quick dishes that easily incorporate healthy vegetables into the mix?

Indeed, I am challenged by this daily. My two athletic sons mow through the meals like there’s no tomorrow, and I am constantly challenged to find ways to work more greens into their diet.

Feeling fairly exasperated by the whole thing a few weeks ago, I resorted to the Asian noodle option. Shoreline’s Central Market had a large display of Asian ingredients on display for Chinese New Year and one of the sections featured the fresh Yakisoba noodles made here at Wan Hua Foods in Seattle. Alongside the noodles was OtaJoy Yakisoba noodle sauce. Admittedly, I fell for the marketing gimmick, grabbing the  store’s handy recipe card and buying the noodles and sauce.

Well, it was  a good move. These noodles, which sell for under $3 per two pound pack, are superb for quick and easy stir fries. The noodles can be used promptly after purchase or, even better, they can be frozen in smaller portions.

    I have found that the frozen noodles defrost quickly and cook just fine.

Rather than give you a strict recipe for my Five Minute Yakisoba Noodles, I am going to lay out the basic steps because this approach lends itself to adaptation and flexibility, leaving you, the cook, to incorporate bits and bobs of vegetables that you might have handy in the bin.

Five Minute Yakisoba Noodles

Step One: Chop fresh ginger, garlic and onion. I usually use about one to two tablespoons of each. Sliced scallion works great too.

Step Two: Chop miscellaneous vegetables into roughly one- or two-inch pieces. I’ve used snow peas, sprouting broccoli from my garden, celery from the fridge, sliced peppers and even a handful of bagged coleslaw mix.

Step Three: Drizzle some oil into a large skillet or wok. Preheat over moderately high heat until oil sizzles when water is flicked onto the oil. Add the garlic/ginger/onion mixture and stir quickly to heat. Do NOT let it burn.

Step Four: Add the mixed vegetables and cook, stirring for a minute or so, or until the vegetable start to turn a bright green. DO NOT overcook. Turn the heat down to moderate if it looks too hot.

Step Five: Add a handful of the noodles, breaking them up into strands as you add them. Grab a pair of tongs and toss. (Note: the noodles do not need to be precooked so that is part of the beauty of this recipe! Furthermore, you can adjust the quantity of noodles to suit your taste or dietary needs.)

Step Six: Add two or three tablespoons of the Yakisoba sauce, tossing quickly with the tongs.

So, it really is this simple to make a quick Asian noodle dish at home. I’ve made this many times since I first purchased the ingredients. My sons hardly notice the vegetables and the dish overall makes a great accompaniment to sliced steak or teriyaki chicken. Feel free to experiment.